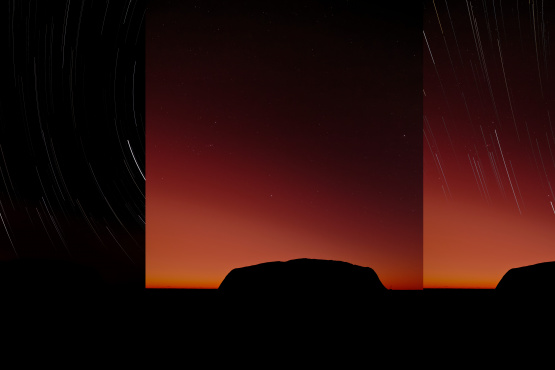

If you haven’t already guessed from the other features on this website, the key ingredient to any great photo is interesting light. Cameras don’t see objects, they see light. Teaching your eyes to see light in the same way can take a little practice, but most of us can already spot a good table at a restaurant when we see one. The best light for shooting food is the window seat, where diffuse but angled light comes flooding in like a naturally occurring softbox.
This applies to a charming little cafe in the laneways of Melbourne, or a luxury resort in the Himalayan kingdom of Bhutan where the following shoot will take place. Regardless of what the light outside is doing the window seat can deliver the right mix of mood and character. We’re looking for a balance of softness, abundance and angle.
The midday sun can be intense and bright, and the worst kind of light you could imagine for portraits of people or still life such as food photography. Too much contrast and sky high angles means the colour and details of your subject gets completely baked out. A grey mid-winters day also presents problems, as the light outside is flat and lacking spirit.
“The window seat” fixes all manner of problems. So long as there is no direct sunlight streaming in, the shade created by an awning, window or doorway will always create a softbox effect by letting that soft angled light come drifting across from one side. This is the light we want as the basic setup for food photography.
Light Lunch
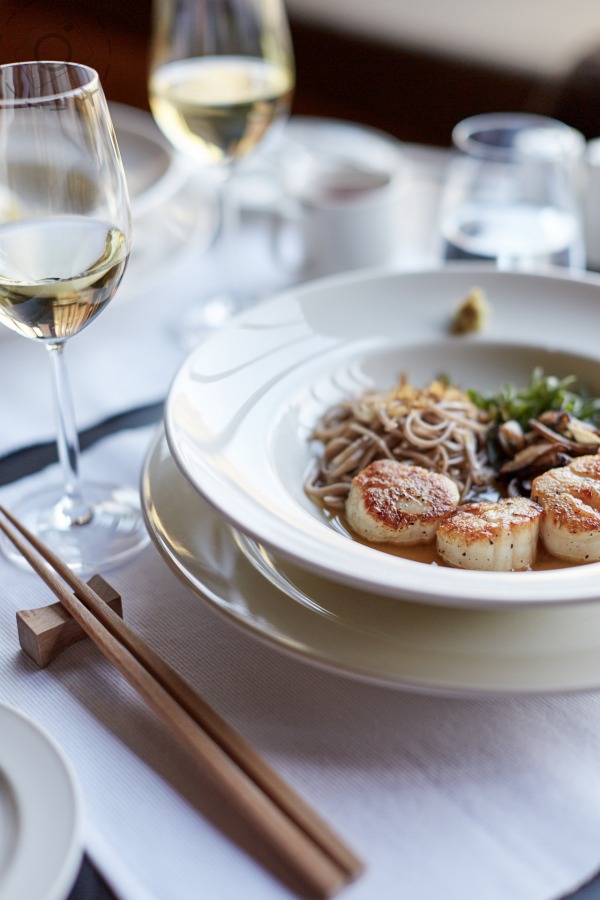
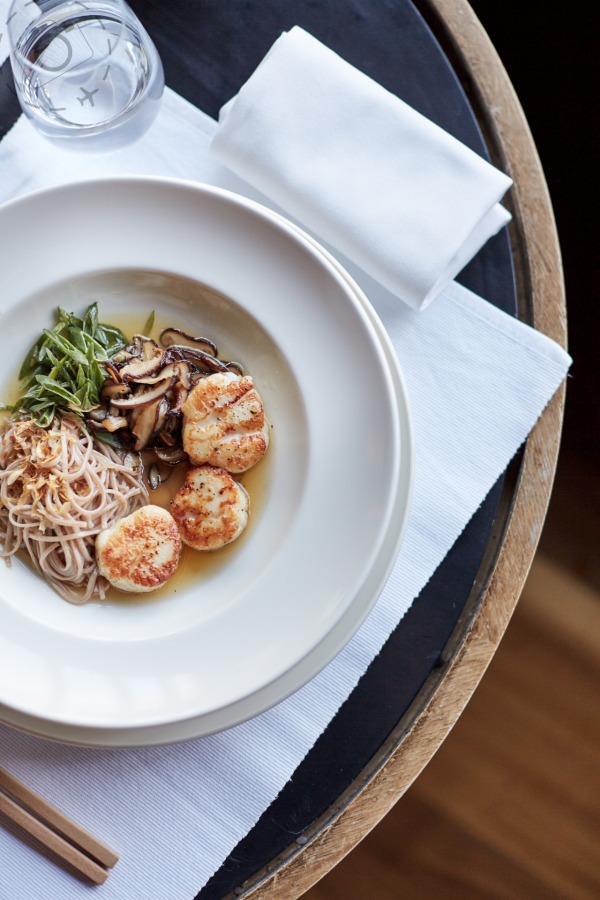
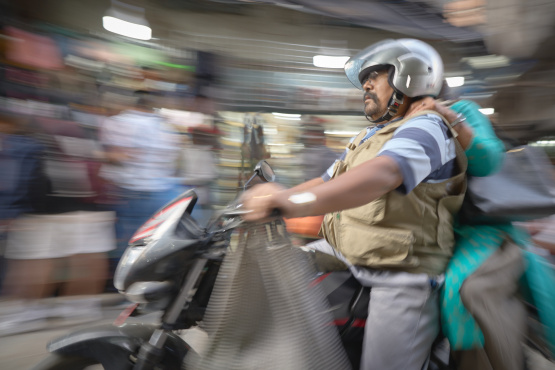
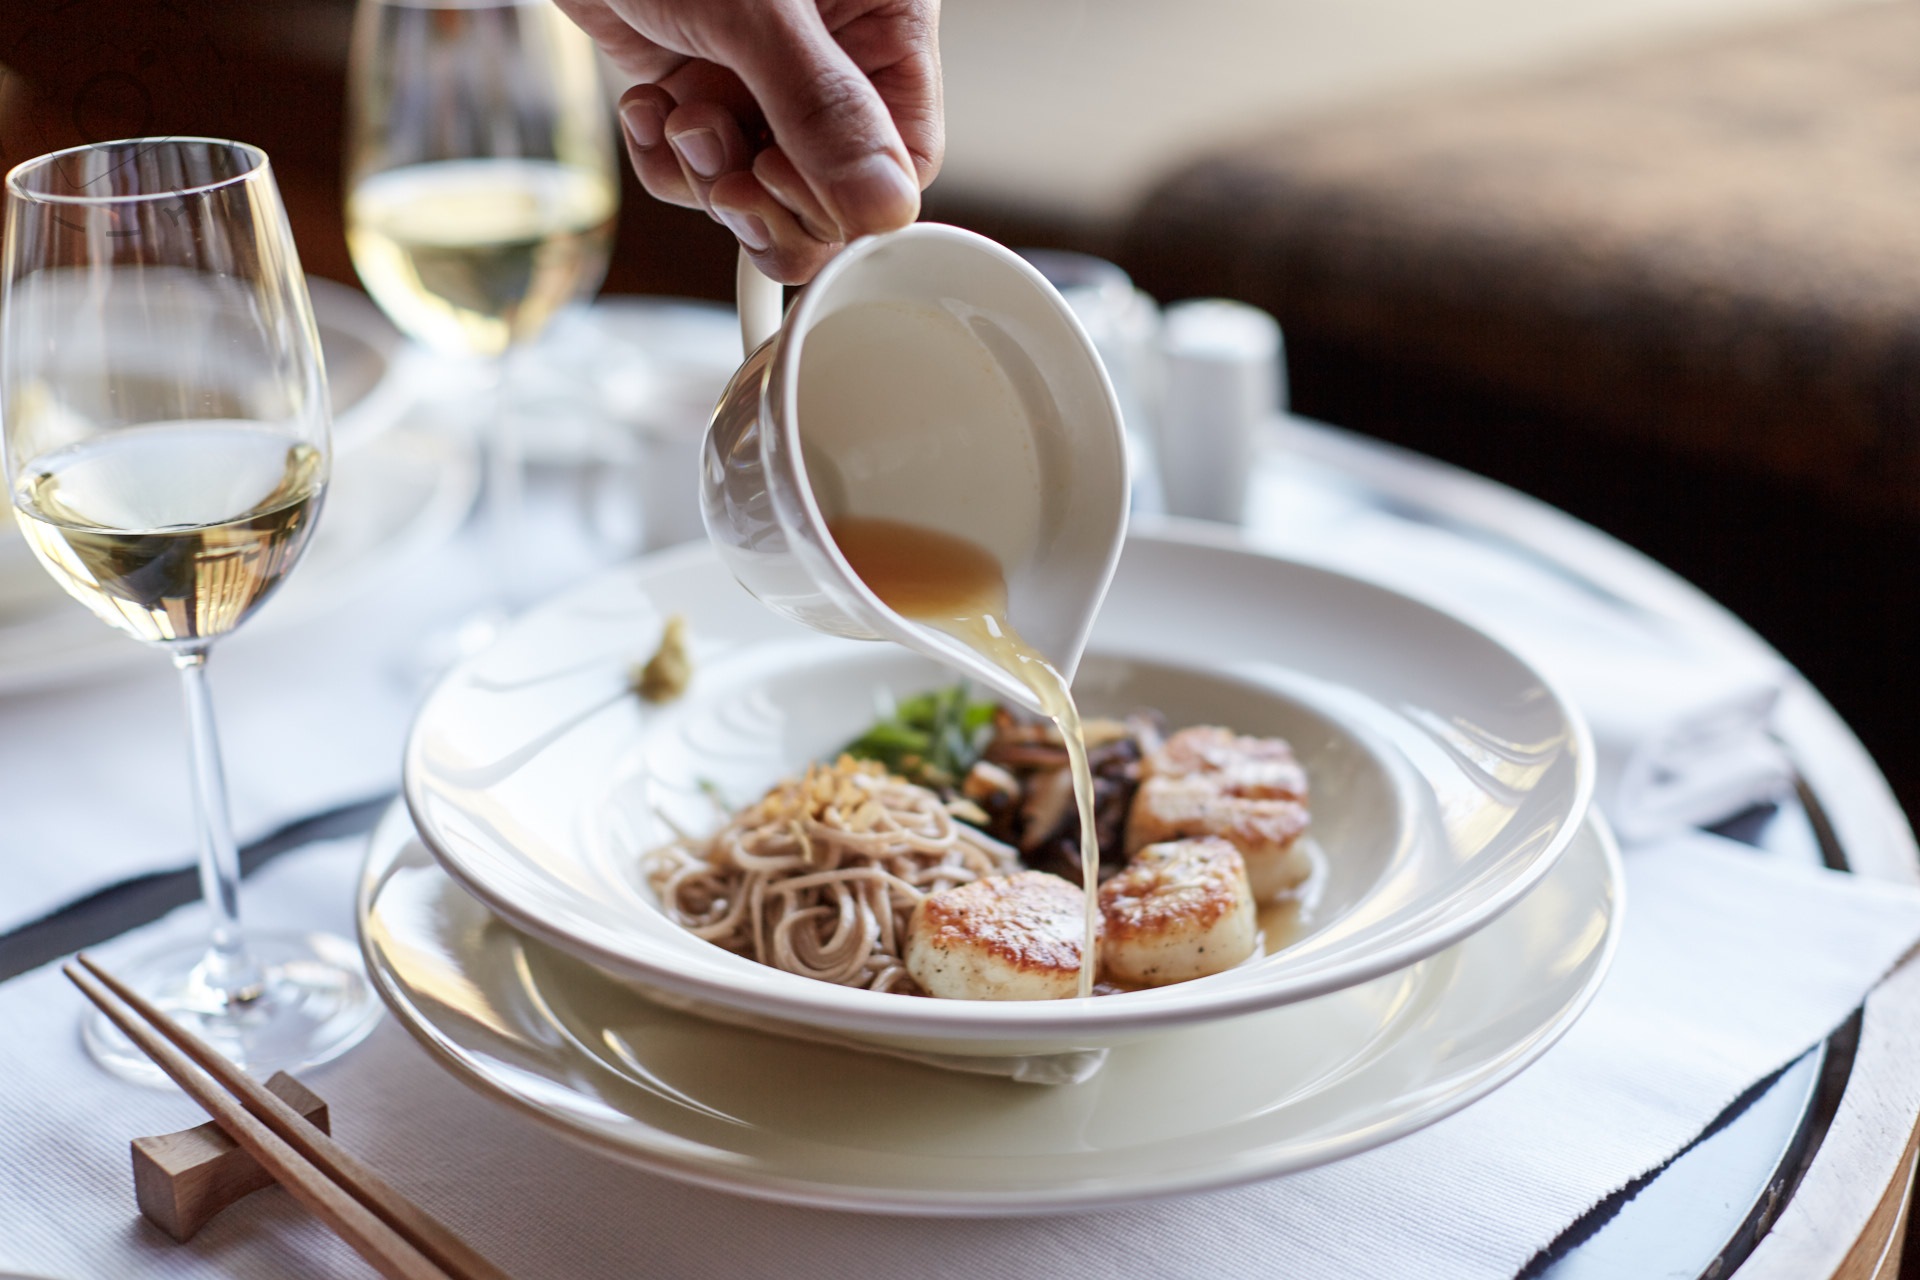
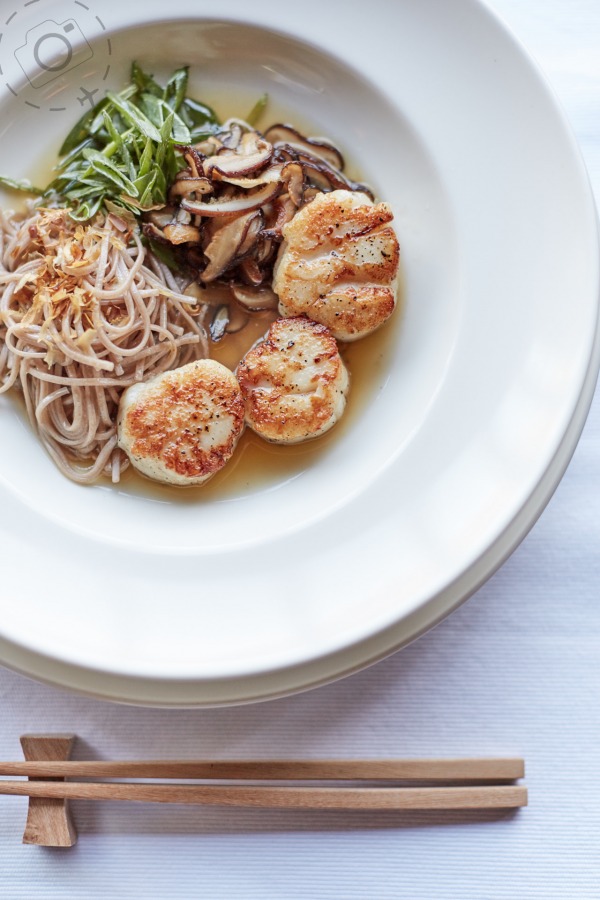
At a lovely resort near Paro in Bhutan we arrive for our photo shoot mid-morning and get to meet the chef. He’s a Bhutanese fellow by the name of Jigme Wangyil, and he’s quickly become one of our favourite people in the country. His simple yet superb dish of scallops with soba noodles and a seafood broth is not your typical Bhutanese fare, but it is seriously delicious and a welcome departure from rice and chilli after two weeks of touring the country.
This resort is aiming for a high end experience in the dining room, and we want the photography to convey that. Other shoots we’ve done along our journey focused on deliciously cheap momos at a farmers market, farmhouse cooking with buckwheat noodles and even a Himalayan take on burgers with yak meat in between the buns. I want my photography to express the style of the kitchen, so today we’re shooting for a light and bright feel balanced with white plates and wine.
The room is long and warm with timber tones. With the late morning sun hitting the other side of the building we have only soft light comign through the windows. It’s an ideal setting. There are really three ways to interpret the light on offer. You can shoot with the windows behind you, to the side, or coming at you. The more the light angles from behind you the flatter it drops, removing contrast to the point of dullness.
Shooting across the light is where the magic happens. Colours pop, contrast rises and the definition of your subject is maximised. If the light is soft enough you can push it further, and turn into the light as well. The more you shoot into the window, instead of simply across it, the more contrast you get. It’s a way of manipulating the drama from a very soft light source. Sometimes that works a treat, sometimes it’s too much.
Shooting into the light is not necessarily an all or nothing proposition. You just need to slide around the table a chair or two to get a little side light into the shot, or shuffle all the way around when you want something 100% backlit. The choice is yours and from the confines of a restaurant table you have great flexibility in the mix of backlight to side light.
Working with this setup takes a little practice and for many people they have to overcome a basic rule of law for photographers. This effect works because the source of light is very soft, and because we have such wonderful processing software these days that a minor tweak or two back on the laptop will make the scene perfect.
Style over Sustenance
Good light and good food are supplied by the kitchen, but to bring it all together you need to practice a little styling. Some people earn more money for a day of food styling than a travel photographer earns for a week of brochure shooting. It’s a dedicated skill that you can’t expect to master overnight, but you only need one great shot to accompany a travel story so lets work on getting that one shot right.
The key theme to good styling is adding props into the frame. If you start with just the basic dish on it’s own, sitting on an empty table with no adornments, then it’s rather dull and looks odd. Our starting point is to work with a table that looks good to the diners eye, and then look for scenes within the setting that work for the camera. This helps to ensure the character of the kitchen is represented, even though we will be tweaking the scene along the way.
Some waiters get really annoyed when I start messing up a perfectly set table, but they soon warm to my madness when they see a few luscious photos on the back of the camera. Your objective is two-fold when styling, using props such as glasses and cutlery to build layers of complexity to the frame but also to give yourself some alternative compositions to pick from.
The key to styling is to avoid thinking too small. We have a saying on food shoots, “to shoot the table not just the dish”. The plate is only part of the shot and you want to bring in other elements to be present too. The bigger you can scale the shoot zone the more composition options that will present themselves. Scale is important.
Camera Recipe
You’ll be relieved to learn that you wont need a special lens or expensive camera to shoot this scene, and in fact almost any small DSLR can handle the task. The simple recipe is to shoot around F/2 with a standard lens. When I say “standard” lens I mean the equivalent of a 50mm perspective. If you have a full frame DSLR then you just need a nice 50mm prime lens. Many primes are very expensive, but the 50mm option is in the sweet spot for value and you can a quality 50mm for a reasonable price.
On a smaller DSLR, the partial frame models with an APS-C sized sensor, a “standard” lens is around 35mm instead of 50mm. This is because the sensor is smaller and it effectively crops half of your image, so you need to pick 35mm on your zoom lens instead. This applies to mirrorless systems like the Fuji X series as well. For Micro Four-Thirds cameras my Panasonic and Olympus you’ll need a 25mm prime to match the 50mm field of view.
Aperture is important here and f/2 is a good starting point. You don’t want everything in focus for a nice food shot, you want the eye to be drawn into the primary subject. It’s a conventional tool for composition and works very well with all kinds of still life photography and portraiture. A lot of good lenses go down to F/2.8, but to get that extra creamy bokeh and the ability to step back and still shoot shallow it’s worth investing a few dollars in a good prime lens.
It’s tempting to settle for a cheaper lens and work at f/2.8 for example, but you’re not pushing yourself and not getting the most impact from your gear. Such shallow depth of field is very demanding for beginners, creating powerful compositions but also requiring some practice to master. Just accept that many shots wont hit the right focus, and only show people the ones that worked!
If you haven’t done a lot of shallow depth of field work then you may need to learn a little about the autofocus system on your camera as well. Most DSLR systems offer a grid of focus points, when really you only want one. I set my camera to use the central focus point alone, and that way I know exactly where in the frame the camera will lock. By pressing the shutter half way down the camera locks focus and I recompose for aesthetics before committing the shutter and capturing the shot.
Wide and Long
If you have a good zoom lens that covers 24-105mm then it’s worth doing a little experiment to see what the alternative shots are like at the wide and telephoto ends of the range. You’ll quickly see why 50mm isthe sweet spot. If you shoot too long, say at 100mm, then you simply end up standing back across the room to get enough subject into the composition. Telephoto lenses are great for isolating and excluding, but remember the essence to good food styling is bringing in extra detail and embellishing the main subject.
If you try to shoot it wide instead of “standard”, say at 24mm or even 16mm if you have it, then you quickly realise that you can’t contain the action. You end up with too much peripheral action that distracts from the subject, and you’re likely to get perspective distortion that just makes the final result look rather amateur. It is possible to shoot food with a 35mm wide angle as well, but you need to practice that skill and you often need a bigger table.
Stick with the 50mm equivalent lens and you can quickly focus on the task of good composition and building up the scene with a few adornments.
Super Models are Tall
Food photography rarely involves super models but they do have something in common. Both work best when shooting portrait. Shooting your dishes landscape is possible and often essential for some magazine layouts, but 99 out of 100 times the winning shots are going to be portrait. Just ask Heidi Klum.
If you’re not accustomed to tipping your camera sideways and shooting then you’re missing out on the best images you never knew you had. We’re all too used to shooting everything in landscape orientation because that’s how most cameras are designed. Trouble is that your average table setting looks dreadful in landscape, with corners getting clipped by the edge of a chair or the main dish sitting heavily on one half of the frame. Tilting to portrait orientation simply provides far more pleasing options for composition.
Aesthetics are a personal choice, but have a glance through any magazine that features gorgeous food photography and see how many frames they print as a landscape? Not many. You’ll even see some cropped square to avoid the landscape option. The lesson here is simple; shoot tall and fill your portrait orientation from top to bottom.
Coming out of the Shadows
By now you have a nice list of technical tune ups that will should allow you to focus on the creative potential of the kitchen. With the light streaming in from behind, soft but bright, you can shoot frames at f/2 and just keep an eye on the shutter speed so you’re getting sharp images. Depending on the location you might get a window seat that leans towards soft instead of bright, in which case you simply dial up the ISO setting as required.
I have routinely cranked up to 1600 ISO on daylight shoots when the light is very very soft, and you will be hard pressed to spot the difference. Noise is only a problem in candle lit conditions, which are not ideal for revealing detail in the dishes anyway. You wont run into problems when you’re just taking advantage of the high ISO to add a little shutter speed.
One more step is often required when you get the images back onto the laptop and start tinkering with the RAW files. Backlighting is very lovely to work with but sometimes a bit of essential detail ends up under exposed. The traditional studio technique when shooting with backlight flash gear would be to add a second strobe that fills in the foreground. We no longer need the extra hardware because we can fine tune those shadows when processing the image instead.
If you use software such as Capture One (or Lightroom, Aperture, etc) there’s an effective solution called Local Adjustment Layers. I create a brush that is wide and very soft and tag the underexposed section of the frame. Once tagged I increase the exposure for that adjustment layer and the job is done, my desired detail is pulled through from lower down inside the RAW file.
The key to making adjustment layers look natural is a very wide brush that has a soft gradient between the effected area and the rest of the frame. Don’t try to be very precise with the brushes, make them rough and avoid hard edges. It takes so little time to paint in a layer and tweak compensate for exposure, but the results will look very professional.
One is not enough
Working with shallow depth of field, natural light and a hot dish that is going cold demands that you work fast and work smart. Don’t just take a handful of frames, take lots. Keep reassessing and adjusting between frames, looking for subtle variations and pulling focus on different elements in the scene. Some dishes will work better when you hit the noodles, others on the scallops. Try them all. It takes so little time and you’ll have the RAW files to review afterwards and pick the winners.
If your tendency is to shoot too close and too tight, instead of using more of the table and the wider scene, then try a little experiment for yourself. Start in tight but take a half-step backwards and reassess the compositions. Keep shooting. Take another half-step back, and another. As you step back you will find more complexity in the scene and more elements to wrangle. Somewhere along that process the right mix of complexity and structure will become evident.
You will also find you end up with a variety of perspectives instead of just one shot. As you step back you find that other angles on the dish present appealing compositions. It’s a process.
If you start with good light and good food, the rest of the shoot will be a joy for you. We don’t always have the pleasure of fine chefs with international experience to work with, but at least a decent window seat with soft light angling through is something anyone can aspire to. At that point you just need a 50mm lens and a little TLC for the RAW files to make real food look really delicious.