
I’ve seen a lot of very bad videos and tutorials online lately pushing the merits of “Dark & Moody” photographic styles for food photography. The trouble is that mostly they are very poor imitations of what you really want to achieve. I want more than just designing a black shoot set and then flooding it with intense contrast and colours, as per your typical glossy magazine.
Our gold standard for “Dark & Moody” is a Swedish photographer and blogger named Linda Lomelino, but we'll talk more about her work at the end of the article.
This how-to guide is intended to help you achieve a velvety smooth effect, in part from clever use of processing techniques, but also by employing a little trick with your flash gear to help generate some depth to your darkness. I don’t recommend a “processing only” solution, I think you will get better results when you shoot the scene being mindful of how you will later process the files.
ND + Flash
One of the goals with this photographic style is to give the room a richly dark ambience, to submerge the space into a heavy black that only certain elements can arise from. To achieve that you ideally want your flash gear to overpower the ambient light, and that’s not always easy. This means dialling up your studio strobes until they are several stops brighter than the room, at which point you typically have more light than you can work with if you want the enjoy shallow depth of field. Flash sync speeds are typically quite modest, say 200th of a second, which means in order to rein in all that extra studio light, you end up moving closer to f/8 for your shots.
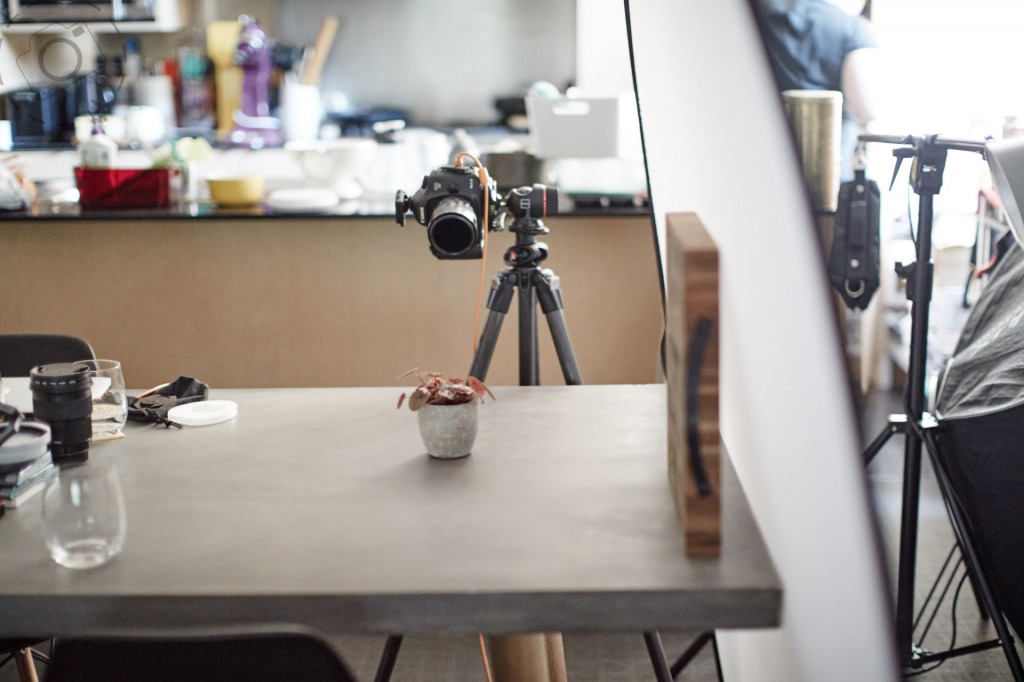
An alternate method is to employ a modest Neutral Density (ND) filter. This might seem like a drastic step, but it does allow you some fine control over the aperture and hence depth of field, while still boosting the flash output far enough to turn the daylight into a deep shade of night. We're using a single 500W strobe and have it dialled up to about 60% power. We have no reflectors opposing the flash and no "black box" to dampen the light, just a simple soft screed to ensure diffusion of the light as close as possible to the subject.
The major downside here is working on a tripod instead of hand held freestyling, so you need take that as a prompt to shoot for greater depth in your work. Fewer frames but better frames.
The rig is simple enough from here. Set the camera on a tripod, lock off the focus so you have manual control, and employ the live view on the back of the camera to help guide composition and adjust focus. ND filters make it difficult if not impossible to focus and compose through the viewfinder, so the live view solution is essential. My pick for this approach is an ND16, which gives you 4 stops of light retardation, enough to shut down the typical ambient light in our kitchen. It’s not enough to halt direct sunlight of course, which is what our flash gear is effectively mimicking. ND8 is also good, but ND16 is one stop stronger at blacking out the room.
Standard Strobes
Once you have the ND16 working to filter down your exposures you can essentially setup for flash lighting as per normal. A good starting point is side lighting with a nice big diffuse final edge. This could be a wide soft box, or just a light screen filtering out a naked strobe. So long as the final layer of diffusion is as close as possible to the subject, you’ll get a controlled but soft fall of light.
Because you’re shooting with an ND filter over the lens, anything outside the immediate strike zone of your flash gear will fall dark. Very dark. This opens the door to much more pronounced exposure zones as you shape the light. A simple baffle to stop light falling onto the background can yield a powerful negative space, for example.
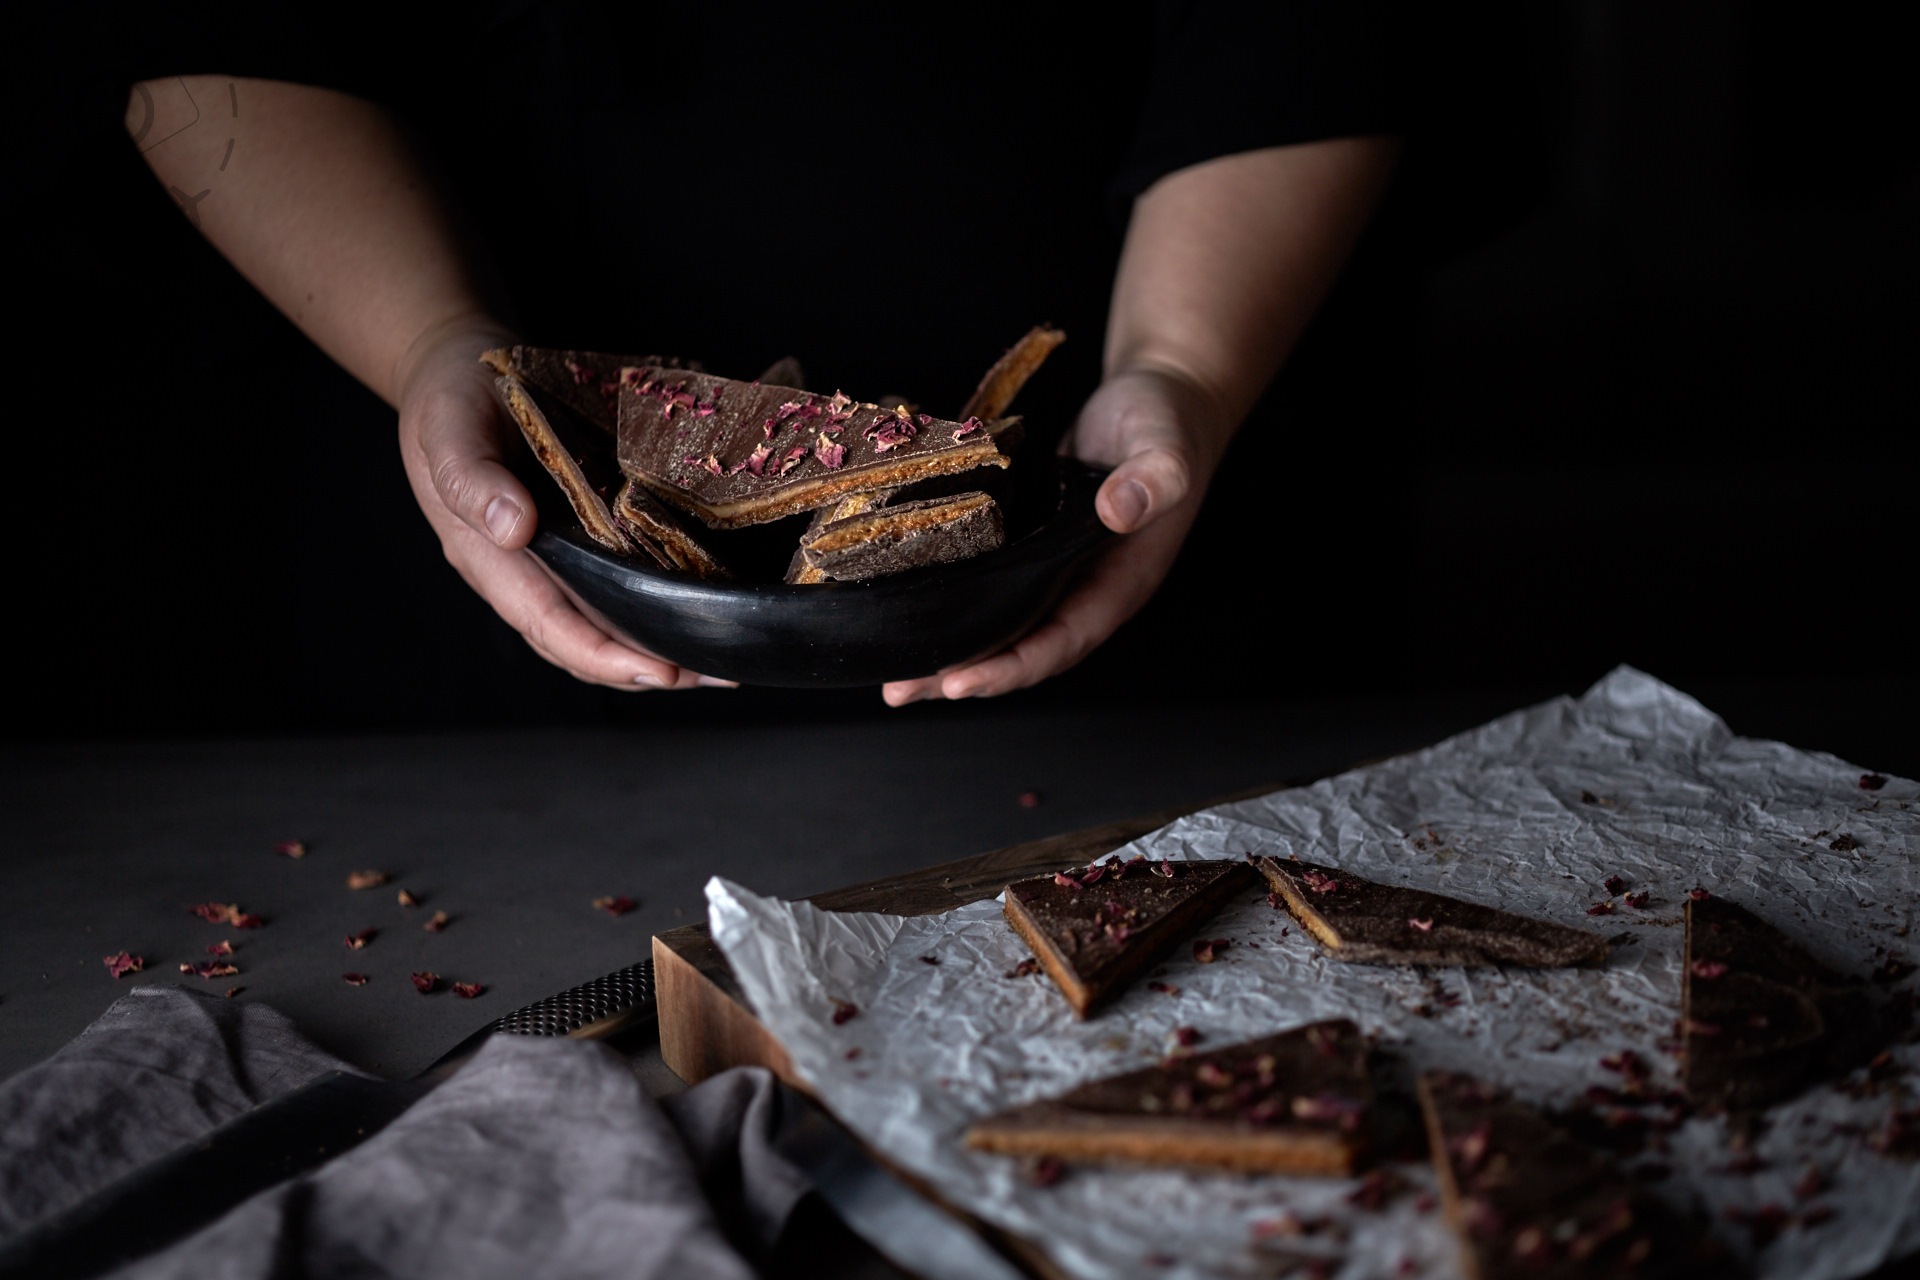
This example below demonstrates how a simple chopping board has been used to restrict the flash from filling in the background. The first frame is without the chopping board, the second with it, and the third without flash to help me verify how much ambient light is prevalent in the exposures.
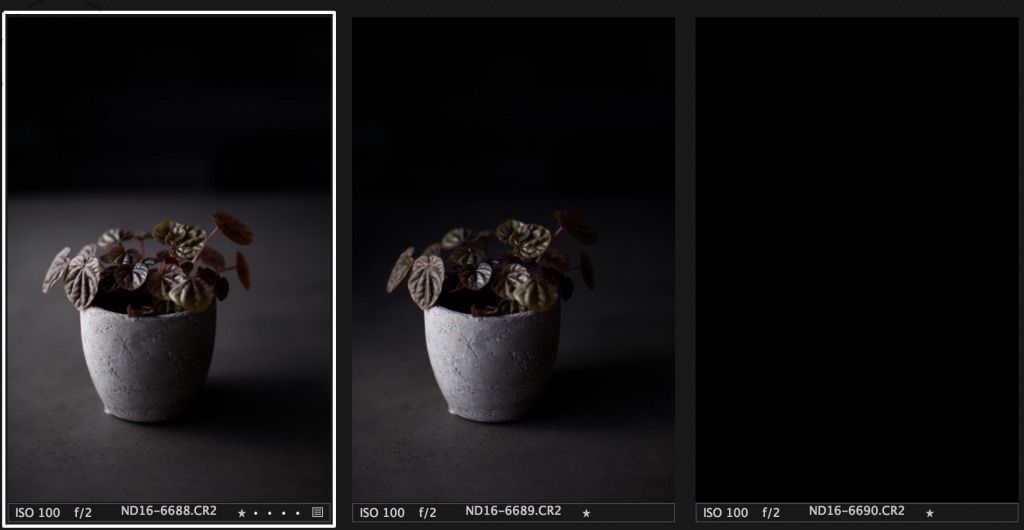
Remember, these three frames have all been given identical treatments. The left and middle images look as though the lighting was setup drastically different, but in fact the ONLY change made between the frames was to slide in place a chopping block that restricts strobe light from filling in the background. This is not a complex setup, it just looks more dramatic because of the rich darkness that fills in the blanks.
The final note on setting up the flash rig is to avoid using a fill-in strobe or even a foam board to bounce back some light. For many who are used to studio work, this will be a hard one to resist, but you must. The entire foundation of the style relies on letting the shadows dominate the frame. You can always pop in a little more detail with an adjustment layer in post-processing, if essential, but the objective here is to embrace your dark sides and use them for composition.
Do Be Negative
Composition with the “Dark & Moody” set is not as per normal, at least not for our normal. Typically we strive to bring out the details and embellish the scene with any extra elements we can drag in. The key to making use of the moody style is to embrace negative space. It’s the gaps in the frame, the quiet spaces left untroubled by light, that bring depth to compositions.
If you’ve never shot with negative space a lot before it can be difficult to get your head around it. It’s not merely a matter of leaving a blank space in the composition, rather it’s about leaving room for the story to be enhanced by imagination. It works best when you have a generous amount of surface to work with, or maybe a generous amount of darkness waiting to encroach on the scene.
The flip side of working with negative space is that you need plenty of “scale" to begin with. That’s often a challenge for food photography, as there’s a tendency to think of this genre as “shooting a plate”, which immediately limits your creativity and compositions. Good styling happens more easily when you have a generous scale to work with, so think of your set as needing to be the whole table rather than just a plate.
Smoothing the RAW
Processing the images is still a major factor in achieving the final look. You may still need to work some adjustment layers to even out the exposure across the set for example, or dodge the exposure on background elements that are punching too bright. Only the hero of your shot should have perky highlights and the richest contrast.
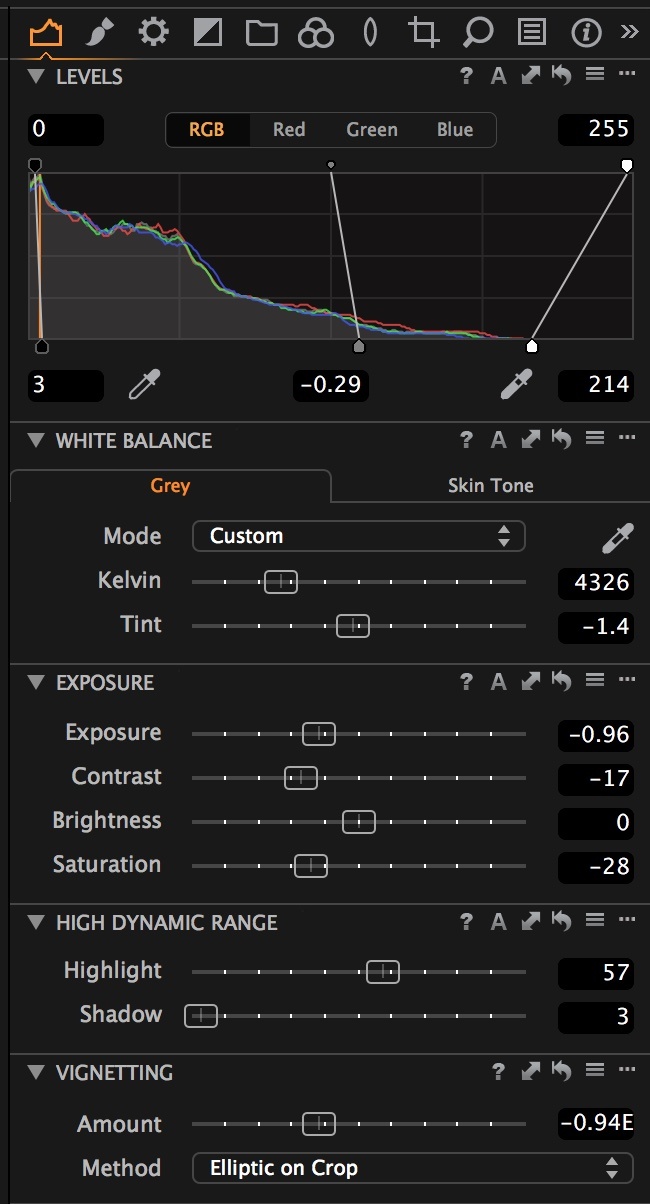
The complimentary processing style to match the studio flash + ND filter technique relies on pulling back on contrast across the frame, dropping back saturation and selectively boosting only the contrast at the white and black ends of the histogram. By keeping contrast gentle in the middle of the histogram you leave room to harden up the black just a touch without killing the subtle detail of the shadows.
If there’s any doubt over blown out highlights, you can employ some smoothing using the HDR sliders of your preferred RAW processing software. Always pay close attention to the midtone balance of your histogram, because bringing back the white point can often cause a knock-on effect of kicking up shadow detail in the midtones as well, depending on how your software works. The examples here are from Capture One, which allows me to go back into the midtones and adjust them to my satisfaction.
I have chosen to darken them a little bit, just enough to ensure the shadows remain pleasingly modest.
Colour Constancy
Bruce Percy introduced me to the idea of “Colour Constancy” and it’s something that will screw with your mind mercilessly once you begin working in the dark and rich photographic style. Our eyes create a sense of “normal”, in terms of tones, white balance and exposure. After spending an afternoon working in the studio and tweaking the processing, my eyes have normalised to my screen and the sequence of shadows and light.
Remember that for me, this style is a step away from my baseline. I work on the edge of high-key almost all the time. When I step away from the processing, and dip back into my normal world for a few minutes, my eyes quickly return to their old habits and suddenly I am second guessing the balance in my dark & moody processing. I re-question the white balance, wonder if I need to cool the colour temperature a little more, or correct a little stronger for a touch of green that my Zeiss 50mm drops into frames. Are my highlights too contrasty, are my midtones too flat, are my blacks too black?
In short, I lose my reference simply by allowing myself to absorb a few minutes of a different processing style.
If you spend your entire photographic journey immersed in the dark & moody style, you’ll set a baseline for your perception. When first dipping into the technique, however, you will need to keep a close eye on suitable references. Use them to pull you back to the end goal; to refocus on the very soft contrast across the frame, calibrate how black the black point is, tune in to how far to cool off the white balance, and decide if the negative spaces are working in your compositions.
Our Inspiration
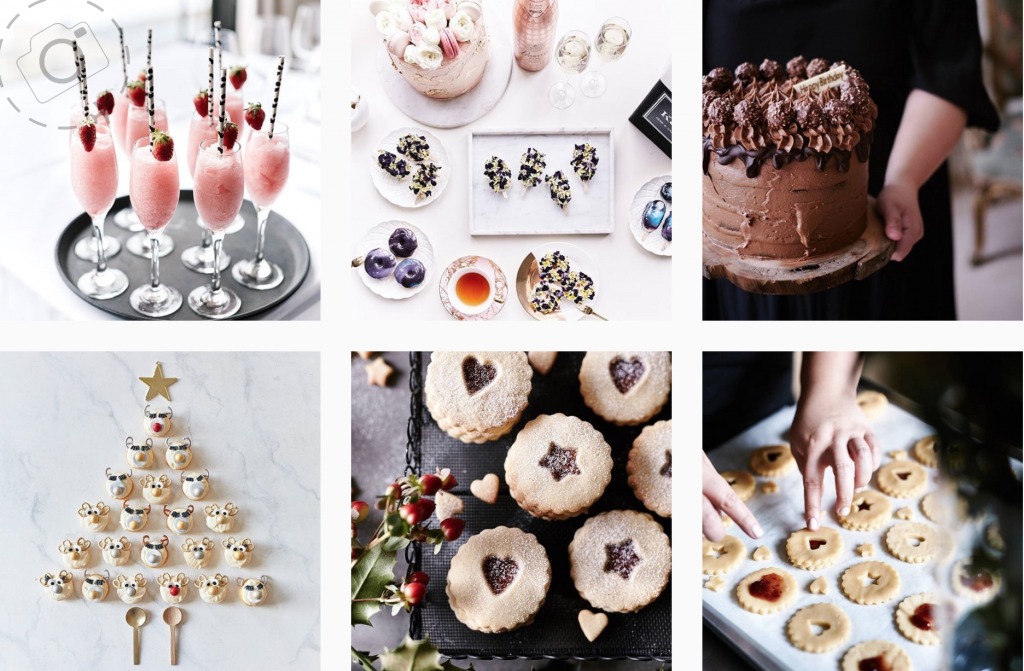
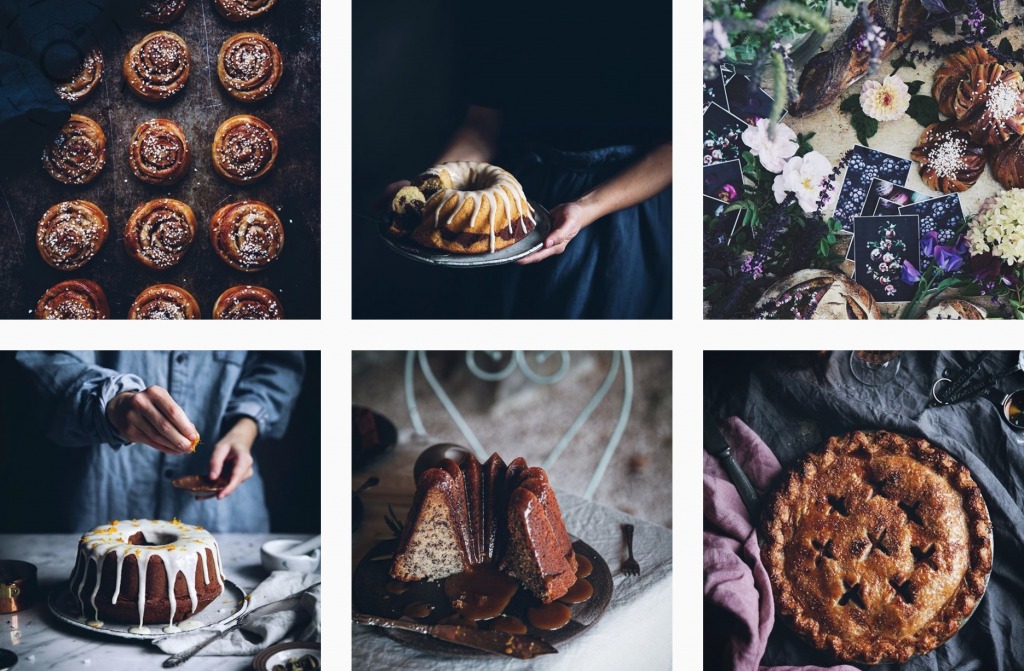
It would be remiss of me to talk of this image style without tipping my hat to the unique and remarkable Linda Lomelino. This immensely talented and rather prolific Swedish blogger/photographer first drew my attention to how to make the most of the dark and moody light. It helps that she creates such luscious treats with which to photograph, but for years now we’ve enjoyed seeing a constant flow of amazing and gorgeous images via Linda’s Instagram account.
Linda Lomelino shows us a thousand ways to take the basic idea and create something truly beautiful. Her use of classic styled props, fine textures, seasonal flowers and antique elements is unmatched. I have no idea what exact studio technique she uses to create her images, in the studio or on the desktop, but the result is something to aspire to.
If you haven’t already followed her, please have a look.
instagram.com/linda_lomelino
Shellieness
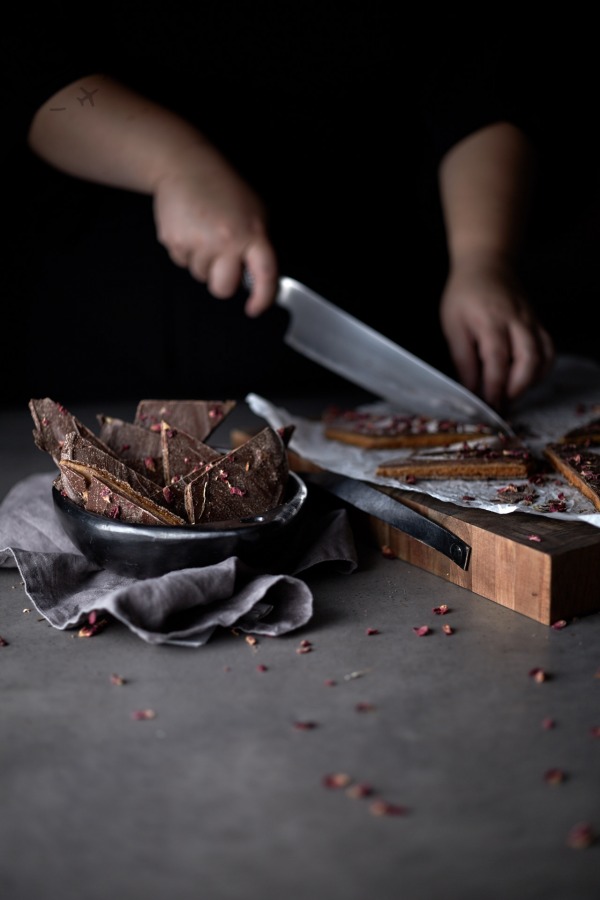
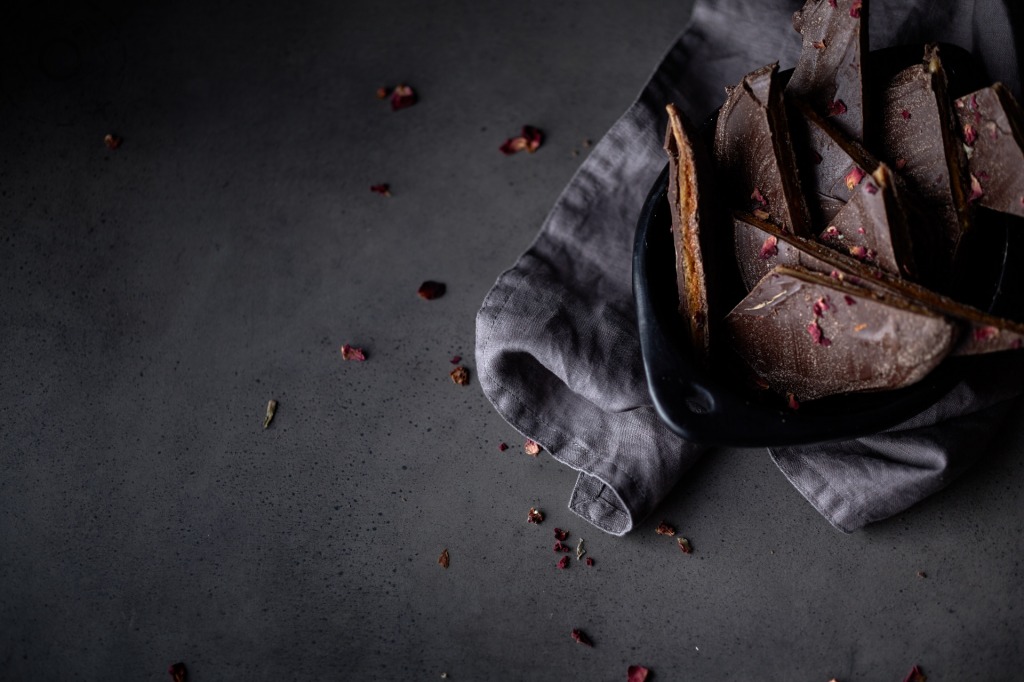
My final word of thanks goes to @ironchefshellie, who is the talent and inspiration behind the rich and dark chocolate scenes used in this feature. Shellie used to be my food stylist, but has since gone on to start her own career in Recipe Development, Food Styling and Food Photography. We still work on a few projects together, such as our food photography workshops in Australia or the occasional lovely client.
The most important ingredient when trying to achieve excellence in food photography, is to start with excellent food! We do not use any tricks in the studio. Everything we shoot is real and is edible and ends up being mauled and eaten once the camera is put down. You can see more of Shellie's work on Instagram, or follow her blog for some stunning recipes and gorgeous photographs.
instagram.com/ironchefshellie
ironchefshellie.com